Introduction - No Transparency in Windows Forms!
If you've tried to work with more complex forms that include images and labels, you probably found out that Windows Forms doesn't support true transparency. You're probably tearing your hair out - but don't sweat!
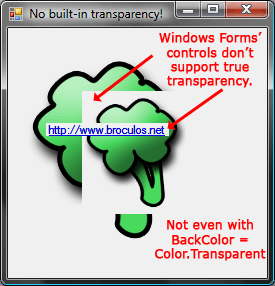
Even if you use the Transparent value for a control's BackColor you won't get transparency. What really happens is that the control will actually render its parent's background. This behaviour is visible on the following picture.

In this article, we will show you a simple way to get labels with pictures as background and also how you can use images and text with correct transparency.
How To Make Transparent Labels
Using a picture for background and labels or text in the foreground with real transparency can actually be achieved quite easily. In this chapter, we will show how to make a label's background transparent.
There are two ways which you can use to get a label to handle transparency correctly with an image as background (there are actually more ways to do this, but we're only going to talk about the more straightforward ones):
- By setting a
Panel's BackgroundImage property and putting the Label(s) inside it
- By parenting the
PictureBox to the Label (label.Parent = pictureBox;)
We will approach the first solution, which doesn't require any code and we can see the result right away in the designer.

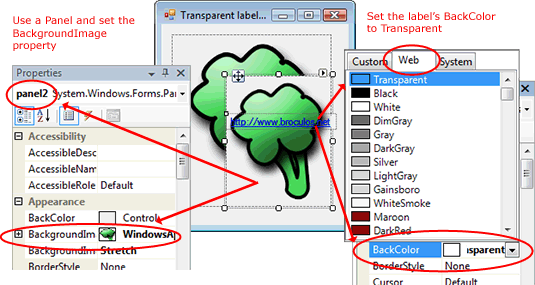
First, start by dragging a Panel to your form. Now set the BackgroundImage property to the image that you would like to see as the background (you can use the BackgroundImageLayout to control its behaviour).
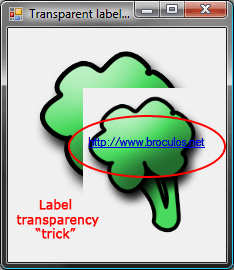
Finally, add a Label and set the BackColor property to Transparent (the first option in the Web tab). The final result should be similar to the following image.

This allows us to use labels with transparency, but the images are still broken (no transparency between them)! Don't worry, in the next chapter we will discuss a solution to use images with real transparency.
Using GDI+ for Drawing Images with Transparency
Drawing images with correct transparency is a little more tricky, because we can't use the default controls that come with Windows Forms and .NET.
For more complex image and graphics manipulation, we can use GDI+, which stands for Graphics Device Interface (it can be found in the System.Drawing namespace).
What we'll do is create a generic control that we can then arbitrarily inherit to draw images and text. This can be found in the project's source code, but if you want to understand how it works, then read on.
Generic Control for Drawing Images
Start by creating a new class which inherits from Panel. Lets call it DrawingArea. This class will have an abstract OnDraw method which will be overridden by its subclasses, so we also need to declare the class as abstract.
Also, we'll add a Graphics object where all the drawing will take place. You should have something like this:
 Collapse
 Copy Code
using System;
using System.Drawing;
using System.Windows.Forms;
using System.Drawing.Drawing2D;
abstract public class DrawingArea : Panel
{
protected Graphics graphics;
abstract protected void OnDraw();
}
We need to make sure our control's background transparency will be correctly handled. For this, we override the CreateParams property to make sure the correct style is included when the control is instantiated (thanks to Bob Powell for this tip).
 Collapse
 Copy Code
 protected override CreateParams CreateParams
{
get
{
CreateParams cp = base.CreateParams;
cp.ExStyle |= 0x00000020;
return cp;
}
}
Now, only two more things are needed. First we must make sure that the background doesn't get drawn. We do this by overriding the OnPaintBackground method with nothing in it.
The second thing that's needed is to override the OnPaint method. This allows us to define the procedure that will be called when it's time for the control to paint itself.
 Collapse
 Copy Code
 protected override void OnPaintBackground(PaintEventArgs pevent)
{
}
protected override void OnPaint(PaintEventArgs e)
{
this.graphics = e.Graphics;
this.graphics.TextRenderingHint =
System.Drawing.Text.TextRenderingHint.AntiAlias;
this.graphics.InterpolationMode =
System.Drawing.Drawing2D.InterpolationMode.HighQualityBilinear;
this.graphics.PixelOffsetMode =
System.Drawing.Drawing2D.PixelOffsetMode.HighQuality;
this.graphics.SmoothingMode =
System.Drawing.Drawing2D.SmoothingMode.HighQuality;
OnDraw();
}
I also defined a DrawText method and some variations so it would be easy to write text. It's a little lengthy so I'll leave it off the tutorial, but you can find it in the project's source code.
Using the Control to Draw Images and Text with Transparency
Now, how do we use this control? We need to make a new class and inherit from DrawingArea. This is very simple and easy to do. Here I provide an example:
 Collapse
 Copy Code
class BroculosDrawing : DrawingArea
{
protected override void OnDraw()
{
Image broculoImage = global::WindowsApplication1.Properties.Resources.broculo;
int width = broculoImage.Size.Width;
int height = broculoImage.Size.Height;
Rectangle big = new Rectangle(0, 0, width, height);
Rectangle small = new Rectangle(50, 50, (int)(0.75 * width),
(int)(0.75 * height));
this.graphics.DrawImage(broculoImage, big);
this.graphics.DrawImage(broculoImage, small);
float fontSize = 8.25f;
Point textPosition = new Point(50, 100);
DrawText("http://www.broculos.net", "Microsoft Sans Serif", fontSize
, FontStyle.Underline, Brushes.Blue, textPosition);
}
}
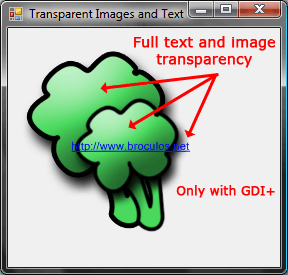
This will draw two images and text (similar to the previous ones), but now with true transparency!
We can use this control like a normal one. Compile the solution. Create a new form. The new control should appear in the toolbox. Drag it to the form and voila! You can see the outcome in the following image:

Conclusion
Now you know how to draw images with transparency. The big drawback is that it isn't as easy to use as .NET built-in Windows Forms controls. The default controls are very limited for more advanced image usage and manipulation, so we used GDI+ to overcome this.
With this knowledge and a little more work, it should be possible to make a TransparentPictureBox. Hope you found it useful.
Resources
History
- 8th April, 2008: Initial post
<!-- Main Page Contents End -->


 加好友
加好友  发短信
发短信

 Post By:2009/6/17 11:36:00 [显示全部帖子]


 加好友
加好友  发短信
发短信

 Post By:2009/6/17 11:50:00 [显示全部帖子]


 加好友
加好友  发短信
发短信

 Post By:2009/6/17 11:53:00 [显示全部帖子]


 加好友
加好友  发短信
发短信

 Post By:2009/6/17 11:58:00 [显示全部帖子]


 加好友
加好友  发短信
发短信

 Post By:2009/6/17 12:03:00 [显示全部帖子]


 加好友
加好友  发短信
发短信

 Post By:2009/6/17 12:05:00 [显示全部帖子]


 加好友
加好友  发短信
发短信

 Post By:2009/6/17 12:45:00 [显示全部帖子]
